Install .NET MAUI: A Beginner to Pro Guide for Windows & macOS
By Kamlesh Bhor · 📅 04 Jul 2025 · 👁️ 6719
Ready to build apps for Android, iOS, Windows, and macOS — all with one codebase? Let’s set up your machine to start working with .NET MAUI!
.NET MAUI is powerful, but you’ll need some tools installed to get going. Don’t worry — this guide makes it simple, even if you’re new.
💻 What Do You Need to Install .NET MAUI?
✅ Supported Operating Systems
You can install .NET MAUI on:
-
Windows 11 (or Windows 10, version 1909 or higher)
-
macOS Monterey (12.0) or newer
.NET MAUI needs modern OS versions because it uses the latest developer tools.
🛠️ Installing on Windows
If you’re on Windows, follow these steps.
1. Install Visual Studio 2022 or Later
Visual Studio is the tool where you’ll write code, design your UI, and test your apps.
➡️ Download Visual Studio:
Visual Studio Download Page
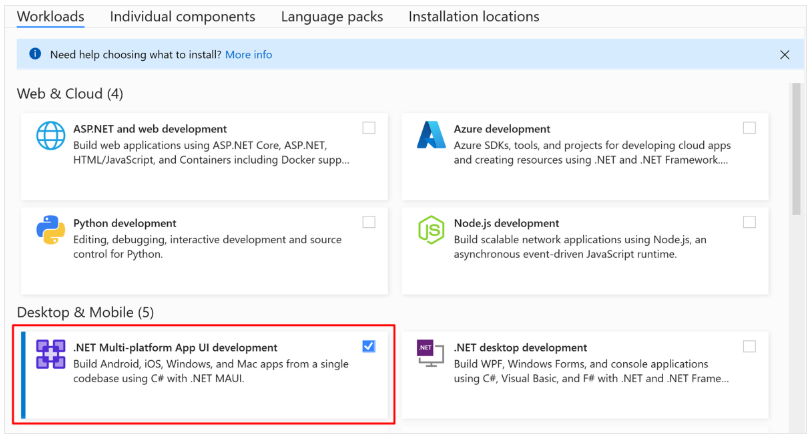
When installing Visual Studio:
-
Choose the “.NET Multi-platform App UI development” workload.
✅ This automatically installs:
-
.NET 8 SDK (or newer)
-
Android SDKs and Emulators
-
Windows development tools
-
Other MAUI dependencies
2. Install Android Emulators (Optional)
If you want to test Android apps without a real device, install Android Emulators. Visual Studio helps you create and manage these.
3. Enable Developer Mode
If you want to deploy apps locally on Windows:
-
Go to Settings → Privacy & security → For developers → Developer Mode.
Enable Developer Mode so Windows lets you run your own apps during testing.
🍏 Installing on macOS
If you’re using a Mac, here’s how to set up MAUI development.
1. Install Visual Studio for Mac
➡️ Download Visual Studio for Mac:
Visual Studio for Mac Download
When installing, select:
-
“.NET MAUI” workload
✅ This installs:
-
.NET SDK
-
MAUI workload
-
iOS and macOS development tools
2. Install Xcode
For iOS and macOS development, you need Xcode.
-
Download it from the Mac App Store.
-
After installing, launch Xcode at least once to complete setup.
✅ Xcode includes:
-
iOS Simulators
-
macOS development tools
3. Configure Command Line Tools
After installing Xcode:
-
Open Xcode → Settings → Locations.
-
Set the Command Line Tools dropdown to your latest Xcode version.
✅ This step is required so .NET MAUI tools can build your iOS and macOS apps.
🚦 Checking Your Installation
Want to be sure everything installed correctly?
Run this command in your terminal or command prompt:
✅ This shows whether the maui workload is installed.
If you see entries like maui and related tools, you’re ready to build apps!
💡 Why Install Visual Studio?
Visual Studio isn’t just for writing code. It helps you:
-
Create new .NET MAUI projects easily
-
Design your app’s user interface (UI)
-
Run and debug apps on emulators or devices
-
Manage updates for SDKs and tools
Whether you’re a beginner or a pro, it makes life much easier.
🔗 Helpful Links
✅ Summary
-
.NET MAUI works on Windows 10/11 and macOS Monterey or newer.
-
You need Visual Studio with the .NET MAUI workload.
-
On Windows → install Android tools & enable Developer Mode.
-
On macOS → install Xcode and configure command line tools.
-
Check your installation with
dotnet workload list.
Once you’re set up, you’re ready to start creating apps for every platform from a single codebase!
All images used in this guide come from Microsoft Docs and are property of Microsoft. Check out the original documentation here: Get Started with .NET MAUI - Microsoft Learn

Article by Kamlesh Bhor
Feel free to comment below about this article.
💬 Join the Discussion